Add Supplies to a Job
You can add Supplies, Kits and Write-Ins to a Job from the Supplies Tab on the Job Card.
Choose the Jobs Icon in the Top Menu to display the Jobs List then select the applicable Job from the List to view the Job Card.

Choose the Supplies Tab and then click +Add Supply button. The Add Supplies pop-up window will display.

Search for and Add Supplies
1. Locate the Supply you wish to add to the Job from the Supplies List. To narrow your search, you can filter the list by selecting a Category or Supplier from the dropdown menus. You can also use the Search box to search by Part Number or Description.
2. Once you have located the Supply item, click in the Quantity field and type the quantity you require for that Supply item.
Repeat this process for each Supply you wish to add to the Job.
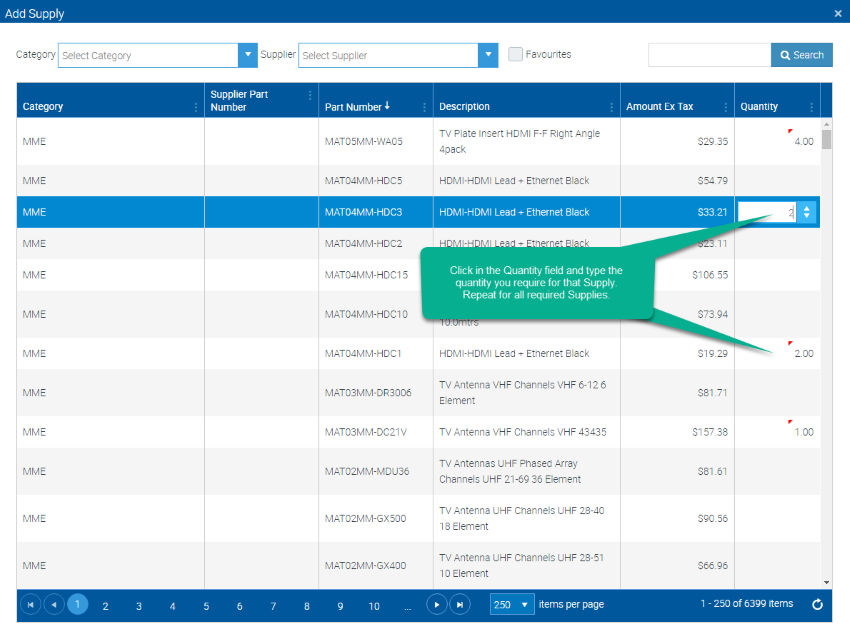
3. Once you have entered quantities for each Supply, click the Save button. The Supplies are now added to the Job and will display in the Supplies List.
4. To adjust the quantity for any given Supply, click the + or – buttons as required.

Edit the Details of a Supply
To edit the details of a Supply, click the Pencil icon. The Edit Supply pop-up window will display.

All fields in the Edit Supply pop-up window can be edited as required. You can also choose to upload an image of the Supply if required, by clicking the Upload Image button.
NOTE – any edits made to the Supply via the Edit Supply pop-up window will apply ONLY for the particular Job. Edits will not effect the master record for that Supply item.
Search for and Add Kits
Kits allow you to group a selection of Supplies and Labour together as a package which can be quickly added to a Job – rather than adding each Supply and Labour item separately. This is useful for frequent or common work which uses the same (or similar) Supplies and Labour. To create Kits, see Create a Kit.
1. Click the +Add Kits button. The Add Kit pop-up window will display.

2. Locate and select the Kit(s) you wish to add from the list by clicking in the Quantity field for that Kit and typing the quantity you require. To narrow your search, select a Category from the dropdown menu or use the Search box. When you are ready, click the Save button.
The Kit(s) will now show in the Job’s Supplies List.

Edit the Details of a Kit
To edit the details of a Kit, click the Pencil icon. The Edit Kit pop-up window will display.

All fields in the Edit Kit pop-up window can be edited as required. You can also choose to upload an image of the Kit if required, by clicking the Upload Image button.
NOTE – any edits made to the Kit via the Edit Kit pop-up window will apply ONLY for the particular Job. Edits will not effect the master record for that Kit.
Add Write-Ins
Write-Ins are used to add Supplies to a Job that are not a part of your standard Supplies List. To add a Write-In:
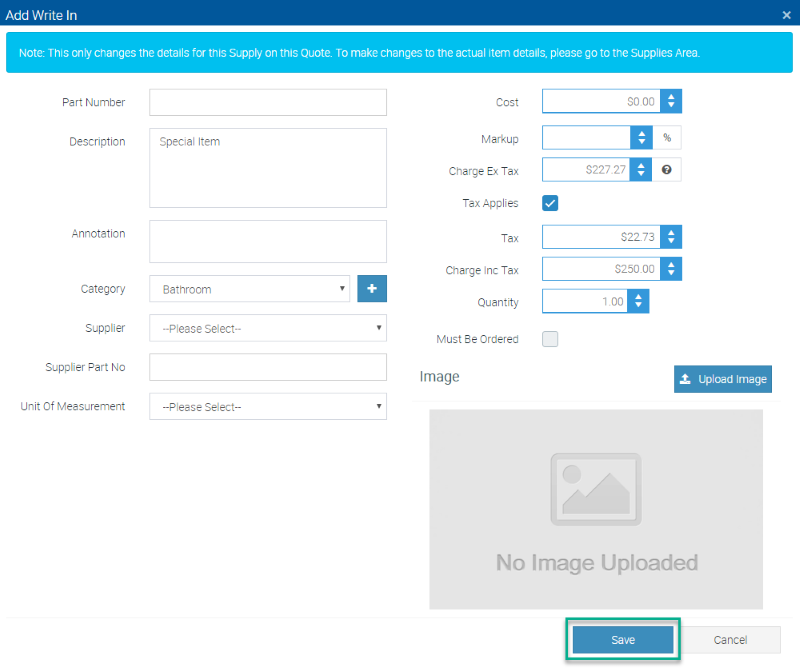
1. Click the +Add Write Ins button. The Add Write In pop-up window will display.

2. Enter as much information as possible for the Write-In. Note that a Description and Category are mandatory.
- Part Number
- Description (mandatory)
- Annotation
- Category (mandatory)
- Supplier
- Supplier Part No
- Unit of Measurement
- Cost, Markup and Charge values
- Quantity required
3. If the Write-In needs to be ordered and included on a Purchase Order, check the Must Be Ordered box. When you are ready, click the Save button. The Write-In will now show in the Job’s Supplies List.
Edit the Details of a Write-In
To edit the details of a Write-In, click the Pencil icon. The Edit Supply pop-up window will display and allow you to edit information as required.

Convert a Write-In into a Supply
Once you have created the Write-In, click the Pencil icon to display the Edit Supply pop-up window. Click the Convert Write In to a Supply button. The Write-In will now be included in your master Supplies list.

Got a Question? Contact our friendly team
Get it now from an App Store