Create a Task
A Task acts like a calendar reminder in Ascora. You can create a Task, link it to a Quote, Job, Customer, Invoice or Contract and schedule it to remind you to perform a function. For example, you may create a Task that reminds you to collect the keys from the real estate agent one day before a Job is scheduled.
Tasks can be created from the Dashboard, or from with a Quote Card, Job Card, Customer Card, Invoice or Contract.
1. Choose the Task Tab on the applicable Card or Details Screen to create a Task linked with that Card or screen type or select the Dashboard Icon from the Top Menu.

2. Click the +Add Task button.

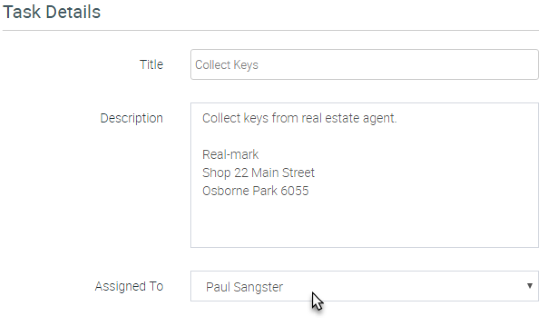
3. The Task Details Screen will display. Enter a Title (name) and Description for the Task and then assign the Task to a User by choosing from the dropdown list.
4. (This step only applies if creating the Task from the Dashboard) To link the Task with a specific Quote, Job, Customer, Invoice or Contract, click the Change button.

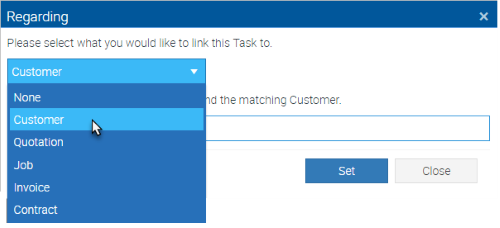
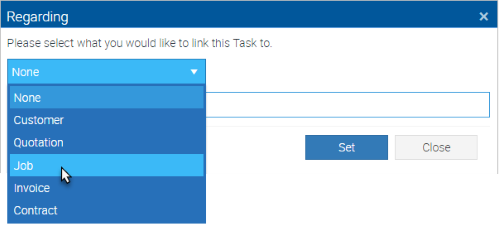
5. The Regarding pop-up window will display. Note that your choice here will also affect the options available under the Due section.
Use the instructions below to link the Task with a Quote, Job, Customer, Invoice or Contract. When ready, click the Save button.
The Task is now displayed on the Dashboard and, if you have linked the Task, will also display under the Tasks Tab on the applicable Card (e.g. a Task links with a Job will display on the Job Card).
Link a Task with a Customer
If creating the Task from the Customer Card, skip to Step 3.
1. In the Regarding pop-up window, choose Customer from the dropdown list.
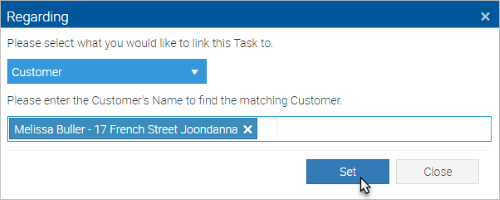
2. Type the Customer’s Name into the text box. As you type, the customer list will refine. For example, if the Customer’s name is Melissa, type “Mel” and the list will refine to show only records which include “Mel”. Once you have located the Customer, select them from the dropdown list and click the Set button.
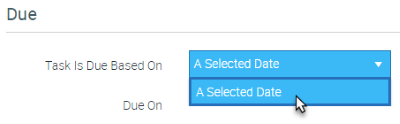
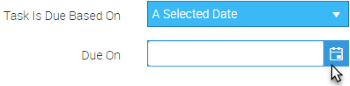
3. Under the Due Section, select the method on which the Task’s Due Date is based on from the dropdown menu. For a Task linked to a Customer, you can only choose A Selected Date.
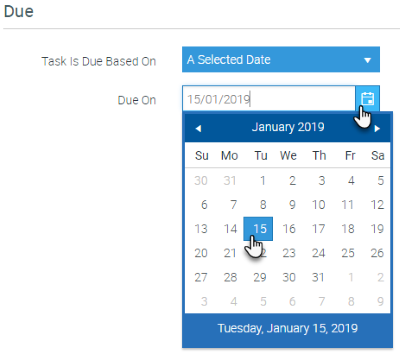
4. Set the Due On date by using the Calendar pop-up window.
Link a Task with a Quote
If creating the Task from the Quote Card, skip to Step 3.
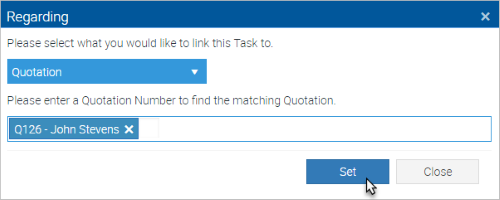
1. In the Regarding pop-up window, choose Quotation from the dropdown list.

2. Type the Quote Number into the text box. As you type, the Quote list will refine. For example, if you type “12”, the list will refine to show only records which include “12”. Once you have located the Quote, select it from the dropdown list and click the Set button.
3. Under the Due Section, select the method on which the Task’s Due Date is based on from the dropdown menu. For a Task linked to a Quote, you can choose from A Selected Date, Date Quoted or Valid Until Date.
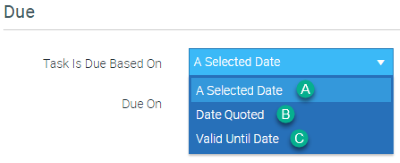
A. A Selected Date – set the Due On date using the Calendar pop-up window.
B. Date Quoted – set the Due date as a number of Days/Weeks/Months Before/After the day the Quote is scheduled. When you choose this option, once the Quote is scheduled, the Task will automatically set its due date based on these criteria.

C. Valid Until Date – set the Due date as a number of Days/Weeks/Months Before/After the day the Quote is valid until.

Link a Task with a Job
If creating the Task from the Job Card, skip to Step 3.
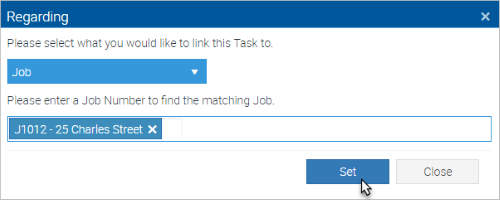
1. In the Regarding pop-up window, choose Job from the dropdown list.
2. Type the Job Number into the text box. As you type, the Job list will refine. For example, if you type “12”, the list will refine to show only records which include “12”. Once you have located the Job, select it from the dropdown list and click the Set button.
3. Under the Due Section, select the method on which the Task’s Due Date is based on from the dropdown menu. For a Task linked to a Job, you can choose from A Selected Date, Date of First Booking, Date of Last Booking, Expected Date or Completed Date.
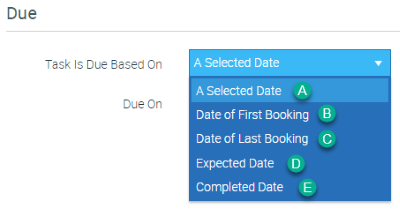
A. A Selected Date – set the Due On date using the Calendar pop-up window.
B. Date of First Booking – set the Due date as a number of Days/Weeks/Months Before/After the day the Job is scheduled. When you choose this option, once the Job is scheduled, the Task will automatically set its due date based on these criteria.

C. Date of Last Booking – set the Due date as a number of Days/Weeks/Months Before/After the last booking day for the Job.

D. Expected Date – set the Due Sate as a number of Days/Weeks/Months Before/After the expected Job booking date.

E. Completed Date – set the Due Date as a number of Days/Weeks/Months After the Job Completion Date.

Link a Task with an Invoice
If creating the Task from the Invoice Details screen, skip to Step 3.
1. In the Regarding pop-up window, choose Invoice from the dropdown list.

2. Type the Invoice Number OR the Invoice’s Customer Details into the text box. As you type, the Invoice list will refine. For example, if you know the Invoice Customer’s name is Georgia, type “Georgia” and the list will refine to show only records which include “Georgia”. Once you have located the Invoice, select it from the dropdown list and click the Set button.

3. Under the Due Section, select the method on which the Task’s Due Date is based on from the dropdown menu. For a Task linked to an Invoice, you can choose from A Selected Date, Invoice Date or Due Date.
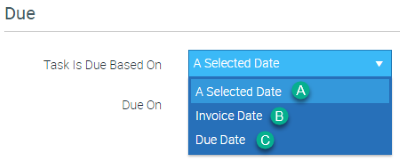
A. A Selected Date – set the Due On date using the Calendar pop-up window.
B. Invoice Date – set the Due date as a number of Days/Weeks/Months Before/After the date of the Invoice.

C. Due Date – set the Due date as a number of Days/Weeks/Months Before/After the Invoice Due Date.

Link a Task with a Contract
If creating the Task from the Contract Details screen, skip to Step 3.
1. In the Regarding pop-up window, choose Contract from the dropdown list.
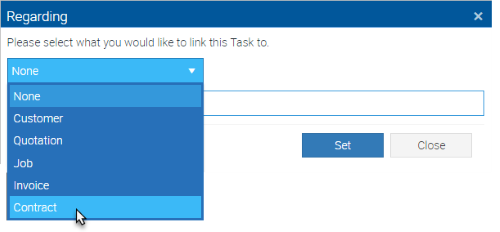
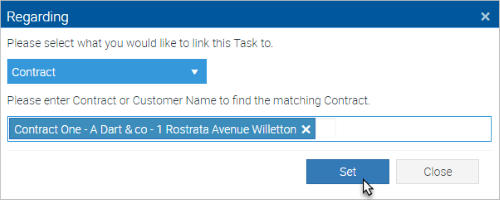
2. Type the Contract OR Customer Name into the text box. As you type, the Contract list will refine. For example, if you know the Customer’s name is A Dart & Co, type “A Dart” and the list will refine to show only records which include “A Dart”. Once you have located the Contract, select it from the dropdown list and click the Set button.
3. Under the Due Section, select the method on which the Task’s Due Date is based on from the dropdown menu. For a Task linked to a Contract, you can choose from A Selected Date, Start Date or End Date.
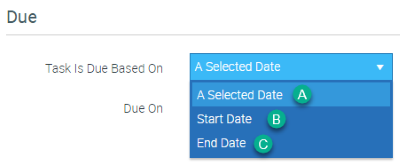
A. A Selected Date – set the Due On date using the Calendar pop-up window.
B. Start Date – set the Due date as a number of Days/Weeks/Months Before/After the start date of the Contract.

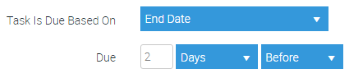
C. End Date – set the Due date as a number of Days/Weeks/Months Before/After the End Date of the Contract.
Got a Question? Contact our friendly team
Get it now from an App Store