Generate a Progress Claim for a Sections Based Job
You can generate a Progress Claim at any stage of a Job. Progress Claims consists of two key steps – firstly creating the Progress Claim Section(s), which define how you will break up the stages of the job or areas to be claimed against, and then generating Claims against these Section(s), which creates the invoice or claim that can be sent to the .
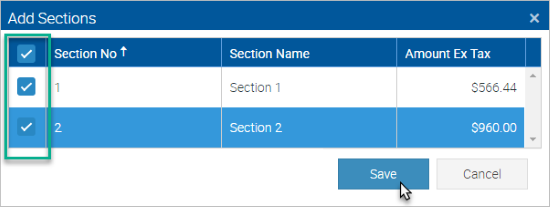
1. If your Job is "Section-based" on the Parent Job Card, choose the Progress Claims Tab then click the Add Claim Sections from Job Sections button. The Add Sections pop-up window will display.


2. Choose which Job Section(s) to add as Progress Claim Sections by checking the relevant checkboxes. When ready, click the Save button.
The Progress Claim Section(s) will be created and display in the list. If required, you can rename the Claim Section(s) by clicking on the Section name and editing as needed. When ready, click the Save button.

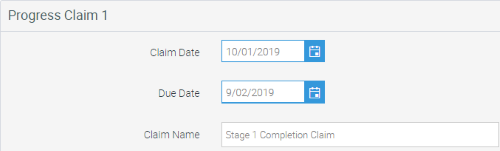
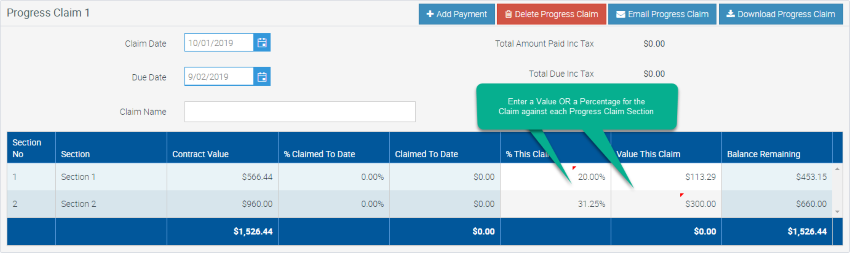
3. Click the Create New Claim button to generate a Claim against the Progress Claim Section(s). The Progress Claim details will display.

4. Enter/confirm the Claim Date and Due Date and the give the Claim a name by typing in the Claim Name box. For example the Claim name could be "Initial Deposit", "Rough In" or "Fit Off".
5. Enter a Percentage or Value for this Claim against the relevant fields for each Progress Claim Section as required. Note that if you do not wish to Claim against one or more of the Section(s) at any given time, you can leave the Claim Value or Percentage fields at ZERO for those Section(s).
6. Click the Download Progress Claim button to save the Claim and download it to your computer as a PDF.
Alternatively to email the Progress Claim directly to your client click the Email Progress Claim button to save the claim and display the Email Invoice pop-up window. Select the required Invoice and Email Templates, add any email recipients and edit the subject line and/or email body text as required. When ready, click the Send Email button.
NOTE: The various Email Templates can be adjusted under the Administration menu.
To record a Payment that has been received against the Progress Claim, click the +Add Payment button to display the Add Payment pop-up window and accept a payment immediately in Ascora.

NOTE: Often Progress Claims may be paid via EFT/Bank Transfer. In this case you would generally reconcile the Payment from your Bank Feed in your Accounting Package. As Ascora periodically checks your Accounting Package for new Payments you wouldn't need to manually enter this payment in Ascora.
7. Subsequent Progress Claims can be generated for the Job by repeating Steps 2 to 5.
Got a Question? Contact our friendly team
Get it now from an App Store